Wednesday, 14 November 2012

Wedding Card Makeover

Hello to all my Lovely Readers,

I am BACK!!!! So sorry for MIA over the past two months!!  It seems that “this sentence” has been a common starter throughout my blog these few months. At the same time, I also want to say SO SORRY to all my blogger friends to not visiting your lovely blog.

Last month, I moved in to my new HDB. In Singapore, we called an apartment as HDB (Housing and Development Board). Over here, seldom people will have enough money to buy a private / landed house. So, most people will apply HDB and pay the installment for like the next 30 years / more.

Anyway, last month I and fiancé went to T-Dragon for our wedding card selection. Wedding card design is one of a perk that we got when signed our wedding package with Grand Copthorne Waterfront (printing service is not included).  The printing service costs us around S$140 for 105 cards.  

Frankly speaking, We I feel that the card’s design is too plain and simple =(

So, I decided to makeover the card to my personal preference. I want it to have classic and rustic feeling.

Original Design
  • A wedding card with shiny gold hot stamping on one side
  • It contains plain text and with a single color printing
  • Plain Cream envelope.
After Makeover:
  • STILL, a wedding card with shiny gold hot stamping on one side
  • Asked them to add two of our customized logo which was designed by ME.  To print a logo, they charge us additional S$10.00 for each image. Since, I requested two images; we need to pay additional S$20.00 for printing.
  • Cream envelope with an additional of liner. It was done by me as well. I spend three days to complete this task. Paper craft bought from Spotlight. Total it cost me S$30.00.
  • And last, I use a wax stamp to seal the wedding card. Bought the Manuscript Pen Sealing Gun Wax Sticks from Maple Tree House. I love love love to shop from there. Sometimes, their products and prices can be too'delicious' for me to ignore =P
Proudly present my wedding card (after the makeover):


Thanks for visiting my blog today. Hope you all have a great Wednesday..

Monday, 17 September 2012

Ribbon Rose Wrist Corsage and Boutonniere

Hello to all my lovely friends!!
 
Today’s post is about my December’s wedding.  
 
Our wedding will be held on Grand Copthorne Waterfront Hotel – Galleria Ballroom. I truly hope that it will be a simple, cozy and small wedding dinner. We will invite 150 peoples to celebrate our special day. The wedding theme is simple, rustic and vintage. I would love to see the combination of champagne (pale brown) – pale pink – white as my wedding color base.
 
We will have two sections for our pre-wedding picture activities. 1st section was with My Dream Wedding Singapore. It was done on June 28th 2012 with Jackson as the photographer.
 
For the 2nd section, we will ask my brother (Danny Tan Photography) to help us. We will do this activity on October 2012. I will share with you all once the pictures done!!
 
Let me tell you my DIY wish lists:
 
  • 10 Wedding Book for Kids: 95% complete, design part complete, left printing only. Will share with you once it complete.
  • Accessories for my Polaroid photo booth: 25% complete.
  • Wedding Guest Book: 0% complete. I still don’t have any idea of how to complete it.  
  • 10 sets of Piggy and Puppy Finger puppet for Kids: 10% complete, 1 set of finger puppet complete, left 9 sets to complete.
  • Wedding Place Card: 0% complete. Don’t have any idea yet.
  • Ang Pau Box: 0% complete. Don’t have any idea yet.

 Proudly present my creation of wrist corsages and boutonnieres for my wedding helper:


Materials:
 

  1. Ribbon roses that I DIY myself. The ribbon cost me S$1.80 to S$2.00 per meter at Spotlight 
  2. Pearls, Burlap and Twine

Saturday, 8 September 2012

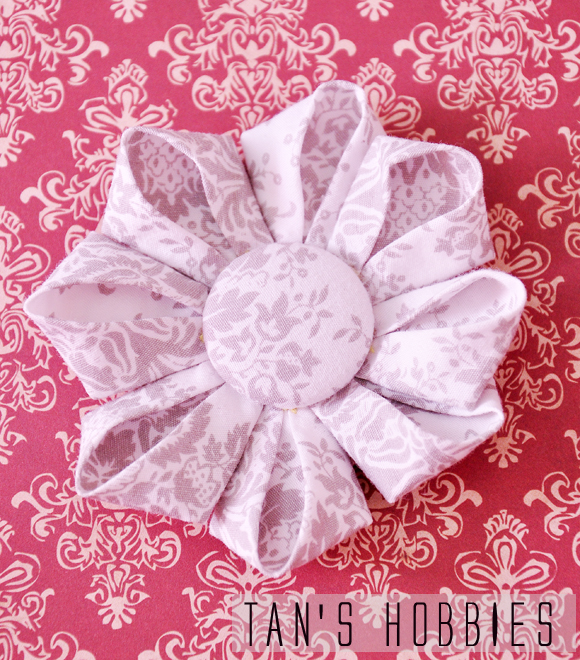
DIY Flower Brooch

Good Morning, All!!

Today is September 8th, 2012. It means, my big day will be arriving in another three more months. OMG, how time flies soo fast!! After my big day, Christmas and New Year will come too!! Haitz, I even haven't prepared any Christmas and New Year card yet!! Well done, Tan =P 

Anyway, just a quick post today! I was cleaning my room last week. And realize that I has many clothes that I can't fit anymore.

Proudly present my creation of Flower Brooch:


Material:
  1. Unused Fabric. You might use paper as well.
  2. Thread and Needle.
  3. Button. I bought this DIY button kit from Daiso Singapore.

And here is the "step by step" procedure of how to make the flower's petal=)


Friday, 7 September 2012

Piggy and Puppy Finger Puppet for Kids

Hello Everyone!!!!!

Just a quick post today! I want to share with you my creation of Animal Finger Puppet.

We are going to have about 10 kids at our 3/4 hours reception. So, I want to give them something fun to do. Beside DIY a Kids Activity book, I also make an Animal Finger Puppet for them.

Here is my creation of Piggy and Puppy Finger Puppet.


Why I choose to make Piggy and Puppy? It just because I was born is boar/pig year and my soul mate was born in dog year.

Hope all the kids will love it =P

PS: Until now, my “follower” section is “STILL” having a problem. So, I decided to join Linkys. If you have linkys account, I will be so happy if you add me as one of your friend =)

Thanks for visiting and hope you all have a great weekend!!

Thursday, 2 August 2012

Wedding Paper Tag

Good Day to Everyone!

By now, I should declare myself as the worst blogger ever =(

For the year 2012 (which is from January to July), I could only managed to publish less than 30 posts!! OMG! I know 30 posts in 7 months are so damn less. I feel so sorry to all my lovely readers for my MIA these few weeks.

Anyway, a bit update about my wedding!!

By the time I am writing this post, my 150 paper bags and the 150 paper tags are done(Yuppie!!!).


As most of you know, I will be getting married this 8 December 2012. I am greedily happily planning to DIY so many things. For now, I just completed the paper bags and tags, but I still need to make another type of tag to be attached to our wedding favor. I also still need to make the place card, design the guest book, wedding corsages and boutonneire for my helpers, etc., etc. !! I hope I can complete everything in another 3/4 months!! 

On my special day, I will be the bride (of course, hehehe) and the wedding planner as well. Hope everything will be smooth!!

PS: A big thanks to one of my lovely and super talented, Annette!! Last month, she sent me a super duper lovely package. I am so happy!! Thank you so much, dear!! I love her DIY card so much. She is the queen of twines and her coloring skill is superb! Please visit her blog to view all her lovely creations.

Wednesday, 11 July 2012

Blue and Black Wrist Corsage

Good Day to all my lovely friends!!

Today I want to share my other creation of Blue - Black Wrist Corsage. I love making those roses and hope everyone will love to seeing it =P


Hope you all have a great day ahead!! Thanks for dropping by today =)

Monday, 25 June 2012

GD for The Shabby Tea Room Week #120 - Soft and Sweet

Good Morning to All!!!!

I got very very good news today! This week I am guest designing for The Shabby Tea Room. OMG, I am so happy and honored to be chosen as one. Thank you so much for the opportunity.


The theme for this week is "Soft and Sweet" and the challenge is to create a card or project USING THE COLORS FROM THE INSPIRATION PHOTO.


When I received an email from Debbie (the creator of Shabby Tea Room), I was so excited to knew that the theme was soft and sweet. In my imagination, I will do something with felt and dacron. And to create the "sweet" part, I was planning to make a cake with some sweet macaroons.

And here is my project based on the lovely inspiration photo from The Shabby Tea Room:


Here is the Macaroon Felt Direction:


The Shabby Girl Designers:
  1. Debbie Marcinkiewicz - {TSTR Creator} - Simple Treasures
  2. Fran Westmoreland - Purple Peanut's Crafty Blog
  3. Lenet Mos - To Scrap or Not to Scrap, That's the Question
  4. Rebekah Faries - Midnite Lullabies Studio
  5. Starr Timmons - The Paper Chase
  6. Tammy Roberts - Paperie Sweetness
PS: The Shabby Team Room Week #120 Challenge will be close on Sunday, 1st July 2012. So, what else are you waiting for? Join this lovely and fun challenge before it's too late =P

Oh, anyway, this cute cake is for my best friend Xu Jie. Now she is currently working in Shanghai. Happy Birthday, Dear!! Can't wait to meet you on my big day!!! Love you =P 

I am submitting this creation for the following challenges:
  1. My Craft Spot. Monday Challenge #61 - Hot Summer Colors
  2. Daisy Doodles Creative Challenges. Challenge #62 - Anything Goes
  3. Crafts and Me Challenges. Challenge #89 - Anything Goes
  4. Love to Create Challenge. Challenge #21 - Anything Goes

Thank you so much for visiting me today. Hope you all have a great Monday!!

Monday, 18 June 2012

DIY Flower from Tissue Roll

Good Day to Everyone!!!

Today I want to share with you a card which I made based on the beautiful inspiration from Case Study Challenge #95.


Their June Muse, Joy Taylor, also created a super lovely card based on the picture. Just visit her blog to see her lovely creations.

Anyway, here is my creation based on their beautiful picture inspiration. Hope you all like it =)


Materials:
  1. Tissue Roll to make the pom-pom flower
  2. Buttons and Pearls
  3. Burlap
  4. Love Birds - Clear Stamp
  5. VersaMark - Watermark Stamp Pad
  6. Distress Embossing Powder - Aged Mahony
  7. Head it Craft Tool
At the same time, I would like to share with you my present from my lovely God Moms, Kathy!! Thank you so much, mom =)

Monday, 11 June 2012

Wedding Favor Candy-Chocolate Paper Bag

Hello, All!!

Yeah, I am back! I am so truly sorry for my MIA these few weeks. Anyway, last Saturday was MY BIRTHDAY!! Thanks to my God Mom, Kathy, for sent me sweet birthday congratulation's email. She also sent me a surprise package, which i haven’t received yet. I am sure I will Love it! Her sweet and lovely thought could always make me so touch!!! Thanks you so very much, mom!!

Today, I want to share with you a 'secret' project that I was creating during my absent. As you all know, I am getting married this Dec 2012. Earlier, I shared with you my creation of felt bouquet. For now, I want to share with you my creation of paper bag for the sweet candy/chocolate wedding favor.

I want to make it more personalized. So, I designed an image as our logo. As I am not so good in drawing, it took me around 2 weeks to perfect it. I designed it using Photoshop CS2 and with pc drawing pad (thanks to my 'future' sister in law for this lovely Christmas present). And after the image is completed, I find a company who can make a customize rubber stamp.

As for the bag, I bought the paper from Popular at Tampines. Measuring, cutting and creating the paper bag are the most tedious job for this project. 1 roll of paper cost me less than S$3.00 (such a good deal) and I can make 8 paper bags out from it.  

Proudly present my paper bag for our big day!!  PS: Hope you all love it =D


For our big day, we needs total of 150 paper bags. By today, I completed 100 bags. Yup, I need to complete the other 50 bags ASAP. I still need to design a ‘thank you’ tag card, place card, a scrapbook for our guest book and many more. So, pardon me for always MIA (hahahahaha, I always got a good excuse, right?)   

I am submitting this creation for the following challenges:
  1. Divas By Design. Challenge 38: Chocolate
  2. Crafty Card Makers. Challenge 70: No Cards, Tags or ATCs
  3. Daisy Doodles Creative Challenge. Challenge 61: Here Comes the Bride
  4. Crafty Creations Challenges. Challenge #173: Wedding or Anniversary
  5. Gingerloft Challenge. G142 Vintage

Thank you so much for always visiting and left me with such a nice comment!! I love you ALL. I hope you all have a great Monday!

Saturday, 28 April 2012

ColourQ Challenge #134

Good Day to you all!!!

Today, I want to share a card that I made based on the ColourQ Challenge inspiration.


Their colour inspirations are very challenging for me. At the same time, I am also excited to try their awesome idea!! They got a lot talented and lovely DT who produce a very beautiful and gorgeous creations on every challenge. Just visit their blog and you will be amaze to see their project!!

And here is my take on this challenge:
I hope the colours that I used are in the right track =P


Materials:
  1. Free lovely girl image from here
  2. Copic markers
  3. Paper and a flower puncher to DIY the roses. I learn how to make those from my lovely friend, Koala.
  4. Butterfly button
  5. Doily Papers to make the clouds
  6. Pearls
  7. Glitter to add some sparkling on the little fairy wings and clouds.
Hope you all will have a great weekend!!

Monday, 23 April 2012

IBS (Inspired by Stamping) Inspiration - IBSIC #5


.*.*.*.*.*.*.*.*.*.*.*.*.*.*.*.*.*.*.*.
ANOTHER LOVELY NEWS: I AM SO HAPPY AND HONORED to be obe of the TOP 3 WINNERS of Inspired by Stamping Inspiration Challenge # 5Thank you so much =) 
.*.*.*.*.*.*.*.*.*.*.*.*.*.*.*.*.*.*.*.

Good Day All!!!! Today I want to share a new challenge from IBS (Inspired by Stamping) Inspiration Challenge.

I know this challenge from one of my lovely and super talented blogger, Tammy. Tammy is one of the IBS Design Team. She is super awesome lady who can create more than 4 or more lovely projects in every week consistently. It is something that I can't do it =P

Anyway, thank you so much dear for introducing this lovely blog to me. There are many creative, lovely and brilliant creations over there!!!

For this week challenge, they want us to use a Doily and Kraft, Pink & Cream colors.


And here is my take based on their lovely picture: Hope you all like it =)


Materials:
  1. Ribbon to DIY the roses
  2. Doily Papers
  3. Buttons
  4. Pearls
  5. Taigang Chipboard Stickers - Serendipity
  6. Lovely background card my lovely God Mom, Kathy!!
Thank you so much for stopping by today!

Friday, 13 April 2012

Back to Black - City Crafter Challenge Blog


.*.*.*.*.*.*.*.*.*.*.*.*.*.*.*.*.*.*.*.
LOVELY NEWS:  I AM SO HAPPY!!! My creation was choosen as one of the Splotlight Artist of City Crafter Challenge Blog - Case Me if You Can - Week 104  
.*.*.*.*.*.*.*.*.*.*.*.*.*.*.*.*.*.*.*.
Hello, All!!

This week City Crafter celebrates their Second Year Anniversary!! Happy Birthday, City Crafter Challenge Blog!! Hope you keep sharing your love with us in many more years to come. Even though I am your new follower, I can see that all your DTs are fantastic and brilliant!! Love their creations sooo much.

To celebrate their 104 weeks, City Crafters are having a "Case me if you can" challenge. What is the challenge about? They want us to go through their Challenge #1 to #103, pick a project created by their talented and lovely DT and case it!

For this challenge, I will choose their Week #91 Challenge, which is Back to Black. And the DT creation I would love to case is Cheryl Jue Girl - Cheryl Nelson.


And here is my intake of this challenge. Hope you all like it =)


I cut out all the images from paper cutting template. It's not that difficult, you just need a good scissor/pen knife and patience to do it. Stick the images to the doily paper before stick is to the base card.   

Materials:
  1. Paper Cutting Template from Chinese Paper Cutting by Diane Feng book which I borrowed from library a few years back.
  2. Scissor / Pen Knife
  3. Ribbon to DIY the roses
  4. Green Leaves
  5. Buttons
  6. Doily Paper
  7. The background card is a present from my lovely God Moms, Kathy!!

The Paper Cutting Template:


How to make the Ribbon roses?

I follow the instruction from here.


PS: To all lovely girls out there, my God Moms, Kathy, is going to do a giveaway. If you interested, just visit her blog and follow the procedure =)


Thank you so much for stopping by today!!

Sunday, 8 April 2012

Flower Bouquet DIY

.*.*.*.*.*.*.*.*.*.*.*.*.*.*.*.*.*.*.*.
LOVELY NEWS: OMG!!!! I AM SO HAPPY AND HONORED!!! Still couldn't imagine that my creation was choosen as the winner of The Shabby Tea Room #108 - Homegrown Flowers Challenge.  
.*.*.*.*.*.*.*.*.*.*.*.*.*.*.*.*.*.*.*.

Good Day to all my lovely friends!!

This week The Shabby Tea Room has a challenge to create a card / project which inspired by the following photo for inspiration. The flowers must be handmade - paper, fabric, felt... anything but cannot be manufactured.


INCORPORATING HANDMADE FLOWERS!

Yeah, I am so excited to joining this challenge!! This will be my first challenge since I started this blog of mine.

For this challenge, I will not make any card. I will make a flower bouquet instead. This bouquet will be for my personal use. I will use it during my wedding photography session, hehehehehehehe.


    Materials:

    1. Felts
    2. Buttons
    3. Thread and Needle to stitch the felt flowers
    4. Yellow Wool Yarn
    5. Un-used papers for the bouquet' base
    Thank you so much for dropping by today!!!